Sunday, December 18, 2011

Keel Box Installed


The keel sleeve is fabricated and reinforced with cedar strips.  The keel was the template for fabricating the keel sleeve (three layers of 6 oz carbon cloth).  After much contemplation I simply wrapped the keel with several layers of plastic sheet and began the keel sleeve lay-up.  I ended up with approximately 3/32" gap all the way around between the keel and the keel sleeve.


The keel box is installed. I measured several times from many prospectives to achieve the position I felt most comfortable with.  First, I verified the boat was level (from bow to stern and port and starboard chines).  Next, I suspended a string down the centerline of the boat (top photo) at a height above all of the frames. I verified the string was in the center at many points along the length of the boat by measuring from the string to the interior chine on both sides of the boat.  I've discovered the boat to be very straight and symmetrical.  Additionally, the suspended string was centered.  Then I hang to small weights (second photo) from the fore and aft string, 1/2" from the leading and trailing edges of the keel box location and used the keel template to mark were there keel slot belongs.  Once the slot was cut through the hull bottom I clamped the keel box in place, verified it was straight in all directions, and started gluing.  Next step is to glass and finish bunk supports.

Friday, November 18, 2011

Mist's mast arrived!

Check out the rig I used to get the 30 foot M20 mast home from the shipping terminal.


I'll tell you, it was and exciting family affair.  Between having difficulty finding the place, wondering how we were to strap this thing on the roof of the mini van, and patiently wating for the folks at the terminal to clean-up an unrelated haz-mat spill my daughters couldn't contain themselves.  The older one, and the book worm of the family, blurted out "This is Mast Confusion".  We all lost it.

The new mast and boom made it home safely.


I have goofy daughters!


The keel is coming along too!  I'm so tired of this part of the project, an enormous amount of hand sanding.  Maybe I'll finish it this weekend and move on to the keel box.


Monday, November 7, 2011

One Year Anniversary

Yesterday was the one year anniversary of laying-up Mist's keel.  Today I finally put the first layer of epoxy on the keel.


I have several hours of handwork into this foil and it turned out beautifully.  I'm far from finished.  The foil still need trailing edge reinforcement, bulb and top plate fasteners, and carbon fiber wrap.  The keel is my major obstacle to assembling and installing the keel trunk between frames 110 and 124.


Checkout this years jack-o-lantern (the one on the right) displayed a week ago.  I'm still doing the sailboat theme. 


Trick or treating is pretty slow in our neighborhood so I kept sanding until the goblins came around.  Notice the light from the overhead?  I wonder what caused that.  Spooky!

Thursday, October 20, 2011

More Steady Progress


The aft two bays are finished with three coats of epoxy.  Though the special clear West System hardener (Number 207) is more expensive it sure is worth it.  It stays clear and produces vary little amine blush. 


I installed a single layer of 6 oz carbon fiber cloth from chine to chine between frames 110 and 124, where the keel box will be installed.  I feel extra reinforcement is necessary because this area of the boat is under large amounts of tensile stress from the keel and chainplates, the 'U' channel shape between the frames will become vary rigid with a relatively small amount of glue and cloth, and the hull bottom and side panel joints are located in this same area.

Working with carbon fiber cloth is a new experience.  It is difficult to tell if you have too little, just the right amount, or too much glue in the cloth.  Unlike the white S-glass cloth, the carbon fiber cloth does not change colors when it soaks up epoxy.  It stays black.  There are no visual indicators to the amount of glue in the cloth.  I favored applying too much glue, then applied peel-ply, and squeegeed out the extra glue.  I think I did fine for my first try but see some areas for improvement.


I weighed the hull yesterday with two bathroom scales.  It is now close to 200 pounds.  I think I'm on track for a boat under class weight of 800 pounds considering I've used between 8 and 9 sheets of okoume plywood, 2 1/2 gallons of epoxy, and several feet of 10 oz biaxial glass tape.


Progress will probably slow down a little now as I have to finish shaping and glassing the keel.  I've also decided to use a slightly different design of keel box then the plans call for.  I'm still hoping to have the back cockpit floor and sides installed  before it get too cold next to the garage door.


Thursday, October 13, 2011

Steady Progress

Meredith and Josie are refining their skills.  Here they are assisting with installing the pumpkin face bunk support located just aft of frame 124.


Mist's aft most bay is complete.  All hull stringers are installed and the entire bay is coated with three coats of epoxy.  Coating the interior has been tedious.  First I applied two coats of epoxy, let it cure, sand the surface smooth and remove all of the gloss, and finally apply the finish coat.  The wood should be well protected from moisture.  I'm moving onto complete the bay between frames 124 and 169 next.

Saturday, September 17, 2011

Have You Ever Spent Too Much Time Sanding?

Checkout the eyebrows on this!

I fabricated and sanded Mist's aft bunk support today.  My mind wandered off to the thoughts of Halloween.    For years I've decorated my young girls pumpkins with sailboat eyes or a sailboat nose.  Now things have come full circle, our i550 is looking like a jack-o-lantern.

Sunday, September 4, 2011

More Stringers and a Compression Post


All hull stringers are installed except the two just in front of the rudder, which will also support the aft cockpit floor. 


The compression post is installed and the bow sprit is hanging there temporarily.


The post was great fun to make. I cut eighteen strips of Douglas fir 3/8" thick with a ten degree angle on each side.  I laid each stick on top of masking tape, sticky side-up.  With all eighteen sticks stuck to the tape I applied ample epoxy to the sicks, rolled the sticks into a tube.  Lastly I wrapped the sticks in ten layers of clear plastic packaging wrap.  All joints between the stick are tight and the post is beautiful. The photo below is a remnant of the post and shows its cross-section.


I've decided to turn my attention to the back of the boat and hopefully get the cockpit assembled soon.  Cooler weather is in the future and the stern is right next to the garage door.

Wednesday, August 3, 2011

Bunks and Fwd Stringers are Installed


Though I haven't posted anything in awhile I have been working on the forward compartment of Mist.  A modified bunk is installed on each side.  I  doubled up the plywood on the underside of each cutout.  The purpose of the cutouts is to provide access to remove any accumulated water with a sponge or handheld pump.  Additionally, air can freely flow in and out to allow the bilge to dry when the boat is not in use.  

I really look forward to putting Mist through the paces and the Chesapeake Bay can really kick up some waves / wind so I feel hull stringers in the forward compartment are a must.


Meredith has been a great help!!! and her epoxying/filleting skills are very good.


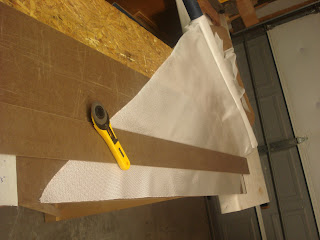
So far for this project I've been cutting my own bi-axial tape.  The two photos above show my method.  First, I unrolled the fiberglass cloth at a 45 degree angle and align it with the edge of the fiberboard.  The fiberboard is the same stuff one uses for a pegboard only without the holes.  Second, I align a straight edge, cut from the same fiberboard, at the appropriate width of tape I desire.  Lastly,  I cut along the straight edge with an Olfa Rotary Cutter.  The cutter is slick and has yet to fail with providing a clean cut on the first attempt.  Once, the tape is cut I need to be careful to prevent tugging on the tape.  It will lengthen significantly and if it does stretch it's width reduces.  Handle the cut tape as little as possible and delicately.

Monday, May 16, 2011

Eye-Spy! Can You Find The i550?


I'm delayed with the building of Mist. I have several sets to build for my daughters upcoming 'Beauty and the Beast' musical theater presentation.  I was desperate for space, so up in the overhead of the garage was the only choice.  I'm looking forward to getting back to the build.

Thursday, April 21, 2011

Sheer & Bunk Supports Installed

If you're building one of these boats and don't own a Dremel with the flexible drive shaft you need to go get them.  I've been dreading notching out the the frames and sanding the twenty plus limber holes of the bunk supports.  My neighbor showed me the flexible drive and I bought one on-line that night, both tools were less than $100.00.  Since I purchased these cutting the small notches and sanding the tight corners have been so quick and easy.

It so happened we misplaced our camera while we were installing the sheers.  I missed a few great shots as Josie and Meredith mixed and spread the epoxy, installed the sheer, and clamped the assemble together with very little help.  They had a truly great time and it is installed as clean and straight is if I had done it myself.  Of course a few days later we found the camera for the shot above.

Tuesday, April 5, 2011

Fames in Final Form / Chainplates Planned

All of Mist’s frames are installed, filleted with epoxy, and taped with 9 oz S-Glass.  The next step is to glue in the bunk supports into the bottom of the hull.  Bunk supports are installed between frames 53 and 169. These serve two functions; they are bunk support, and they’re hull bottom stringers.  I’m choosing to have large lightening holes in the supports to allow air to move through to assist drying any water that may enter the boat.  I'll have photos of the bunk supports on the next update.  The photo below shows the boat with all frames installed.


I finished designing the chain plates for Mist but have yet to assemble them.  I spoke with Colligo Marine to determine 5mm Dynex Dux is adequate synthetic rigging for the i550.  After determining the breaking strength of this Dynex Dux,  I used 'The Gougeon Brothers on Boat Construction' book Chapter 14 'Hardware Bounding' as a guide I determined the minimum length of G-10 tubing needed to support the mast's loads.  Four inches of 3/4"D G-10 tubing epoxyed into the stem and hull sides is a conservative length hold.  The Dynex Dux will pass through the center of the tubing and will terminate with a large stop knot.  I was hoping to be further along with assembly.  Suppose I've been over optimistic!  I'll keep working at it.


Monday, February 28, 2011

Epoxy/Fillet/Cloth-Tape Details

Itamar, Dan #185 left a comment on my last post requesting more detail on why gluing both hull side top hull bottom joints and the transom in one go was a mistake.  First let me explain I'm new to the blog thing and don't know how to reply solely to him, so I'll just post what I know.  Also, although I've wanted to build a boat for years this is my first build so I'm still on a learning curve too.  Here I go, I've read the West System User Manual several times plus I know a very experienced builder who is always willing to answers my questions.  The manual is free at any West System supplier and available on the net at their web-site.  After studying this manual two principles keep going through my mind: 1) a chemical bond between layers of epoxy is much better than a mechanical bond , and 2) clean-up the blush before applying another coat of epoxy.  With these two thoughts in mind I plan my glue jobs such that I will apply a new coat of epoxy to 'already cured' layers of epoxy as few times as possible over the course of build.  This assures I achieve the chemical bond and avoid the blush.  These are the steps I take to glue a joint: 1) prep the joint, sand the wood with 80 grit and brush/vacuum to remove all dust, 2) wet out the joint with only mixed epoxy, let it soak into the wood, 65-70 degrees F with slow hardener allows the glue to really soak in. 3) once the wet coat tacks-up apply the fillet, that's another discussion, 4) once, the fillet tacks-up apply another wet coat of epoxy, without delay neatly lay the cloth into the wet epoxy, 5) apply additional epoxy where the cloth looks dry, I especially concentrate on the filleted area where most of the stress is on the joint, 6) let the three layers of epoxy tack-up, and apply one more layer of epoxy to fill the weave of the cloth, 7) now, I place release fabric over the fresh coat of epoxy to minimize blush and prevent having to sand any cloth fabric fibers, 8) when all exopy is cured remove the release fabric, you'll be pulling any blush off with the release fabric.  When we glued the hull's joints in one go temperature was alittle over 50 degrees so the epoxy wasn't as liquidy as I like so I had to message it into the wood, and cloth, Time Consuming! I also used fast hardener, more pressure to move fast! On top of that your just about standing on your head, all-day!  It was an accomplishment but I'll plan differently next time. It's well worth the effort and expense to practice this on a few scrap pieces of plywood before doing it to the boat.  Then break this practice piece and see if the wood is failing and not the glue joint. If the wood is failing you must be doing it correctly.  It's all FUN!

Tuesday, February 22, 2011

Frames Installed in February


Hull sides are filleted and taped to the hull bottom.

The big mistake here was we decided to glue both sides and the back of the boat in one go.  It took seven hours of Josie and Meredith mixing epoxy with me applying it as fast as possible to prevent it from getting too hard to move to the next step.


Current view looking aft.


Current view looking forward.

All frames are installed which requires several steps.  First one needs to accurately position the frame.  For the most of the frames (18, 53.5, 89, 169.5, and 214) we (Josie, Meredith, and I) used a string and plumb-bob to place several marks on the hull bottom and sides then connected the dots.  For the two frames that support the keel (110 and 124) I used a laser from the overhead of the garage to connect three  points of reference (each side at the shear and a plumb-bob mark at the hull centerline.  Mounting each frame consisted of applying epoxy to wet-out the the joint, clamping it in place with as few wire-ties as necessary to allow epoxy to cure.  They are then reinforced with epoxy-microbollon fillets and 6 oz,  4" wide biaxial S-glass.  No wonder I haven't updated the blog! 

In addition to installing the frames we've fabricated the plywood reinforcements for the keel box, shaped the stem (bow), and scarfed together two nineteen foot long 3/4" x 1" pieces of douglas fir for the shear (the piece of wood at the hull side to deck joint). 

We've been published. Checkout page 24 of the February edition of SpinSheet magazine. http://tinyurl.com/SpinSheet-021611  Also, to our surprise the article was posted the Scuttlebut website on Feb 16th.

The goals for March are to finish reinforcing the keel box area, install the shear and stem, and begin adding the bunk support/hull stringers.  Wait to see the chainplates I've been imaging.

Tuesday, January 18, 2011

I Should've Known!

Updates are added in blue text and the photos are new.

Boat building is bound to have it's aggravations.  I've found three.  I'm only revealing these issues for completeness, each of them is not that big of deal in the big scheme.

Starting with the smallest; a small area (2" by 4") of plywood on the starboard side around frame 169 began to delaminate it's outside ply.  What disappointment when you spend the extra money on high quality materials.  I think this was all caused due to a small flaw in the outside layer of wood, mixed with the high induced stresses from bending, and mixed with the cyclic temperatures and humidity in the garage.  This area has already been repaired by glue and proper clamping.  I've inspected the entire rest of the hull and haven't found any other areas of concern. Update; the image below is the repaired area.


For the second issue; when I cut out all of the frames I followed the templates.  Well the templates for the outboard edges of each frame were straight. Upon inserting the frames into the boat a gap appeared between each outboard edge and the hull's side panel. The fix for this is to template the side panel's curvature into the frame, glue a strip of plywood (approximately 3/4" wide) onto each side of the frame, and cut the frame to match the templated curve. On the the first frame I've installed, frame 18, this worked perfectly on the first try.  Update; I happen to replace frame 53.5 and the image below shows the issue best.  For the other five frames I added a sliver piece between the frame and hull side panel.


Lastly, when building the strong-back, the cradle glued to the floor, I paid great attention to determining the height of each frame relative to the baseline string. Well mistakes were made, several of the cradles supports have gaps between them and the hull bottom. So, I'll take a step backwards, lift and support the boat off of the cradle, 3'ft high, adjusting the cradle's support position, and lowering the boat back into the cradle.  This will take awhile.  For the record the proper dimensions for each frame are as follows: Stem - 6.4", frame 18 - 4.75", frame 53.5 - 1.95", frame 89 - 0.7", frame 110 - 0.84", frame 124 - 1.22" frame 169.5 - 4.15", transom - 7.93".  These dimensions were obtained from the design owner who pulled them from the auto-cad files of the boat.  Now for the truth, I'm now convince I don't even need this cradle. So far each of the hull's plywood panels and frames have lined-up within the wide of the 0.5mm pencil line reference marks taken from the templates.  The boat is coming together extremely straight and the cradle is not necessary. I'm going to correct the cradle so the hull bottom can support my weight while gluing the interior. If I build another i550 I'm not going to bother with a cradle, instead I'll support the hull with foam mattresses and straps.   Update; The boat was light enough to lift and set on sawhorses.  This allowed me plenty of room to rebuild the seven hull supports located under each frame.  They are now evenly contacting the hull bottom.

Monday, January 3, 2011

The Fun Is About To Begin

Though the hull panels are assembled the boat is not in its final shape yet.  The center of the hull bottom still has a much flatter profile than its designed shape. The next task is to pull the hull side panels together to the designed dimensions. This will relieve some of the pressure on the bow allowing me to install the first frame and assemble the stem. Once the bow is complete temporary weights will be added to force the bottom panels down against the cradle. The the rest of the frames will be added, stay tuned! We'll see how that works out. Aligning the frames and gluing them in place will be tedious. How to contact us "apriltied at gmail dauht com".

The Hull Takes Shape


 The family; Connie, Josie, and Meredith really enjoyed assembling the hull with me on 1-1-11. Connie supported the panels, Josie fed the wire-tie up through the holes, and Meredith stuck them back to Josie.

No Christmas Party this Year-The House is Full of Boat Parts

Joining of the hull panels. I used glass cloth and epoxy to secure the plywood at butt joints. Two joints were necessary in each side panel and the hull bottom. Had I to do it again, I'd use scrap 1/4" plywood to overlay each of the panels to be joined.  It was very difficult to get the entire length of the butt joint to line-up in the same plane. If one were to use the plywood overlay you can press the panels into a straight joint.

The Foundation

Though it is not entirely necessary to build a foundation for a stitch and glue boat, I spent the time to construct a strong-back to better assure I end up with a straight boat and that the hull bottom comes out in the designed shape. The strong-back should remain straight as it is glued to the garage floor. I utilized a homemade water level, laser, and tight string to lay it out.

Template and Cut

I purchased a license to build i550 hull number 296, plans, and Tyvek templates from Watershed Sailboats for $240.00. I decided to use the templates instead of purchasing the kit for two reasons. I can't stand the thought of spending money on shipping to receive the twenty sheet plywood kit, and I want to make minor changes to the cockpit.  As designed the cockpit has sharp edges. I feel the sharp corners are stress risers and uncomfortable to sit on. I choose to build the hull of okoume plywood. Twenty, 1/4"thick, 5-ply sheets are required. Above, I'm laying out the templates on the plywood and tracing the edges. The living room is a comfortable place to work! Once the plywood is marked I cut the panels out using a jig saw, then final shaped them with them with a hand plane and sanding block.

The Keel is Taking Shape

The keel is beginning to take shape.  It is nine segments of African Mahogany laminated together. I'm hand planning it down and will achieve a NACA 0012 profile. I feel like I've walked 6 miles, 6 feet at a time. The keel receives two layers of glass cloth and a maximum thickness of 2" is allowed, so I have a ways to go. The keel's final shape will be needed in the later portion of hull construction to template the keel box from.

Beginning of a New i550 the 'Mist' Hull #296


Construction of a new i550, an 18 foot sport sailboat has began.  Upon completion it is intended that the boat will be sailed in the lower Chesapeake Bay. Hopefully this boat will catch-on, others will build one, and I can race it too! The picture above is the remnant from the keel showing construction start date.